

This universal pointer or LED bar graph indicator circuit can be used with any kind of input sensor that delivers a exponentially varying voltage. This can be for example from a temperature sensor, hygrometer and a battery that needs to be monitored whose output could be translated into an LED based bar graph indication for quick reading..
How the Circuit Works
The contents of the circuit are are an amplifier circuit IC1 and a display stage IC2.

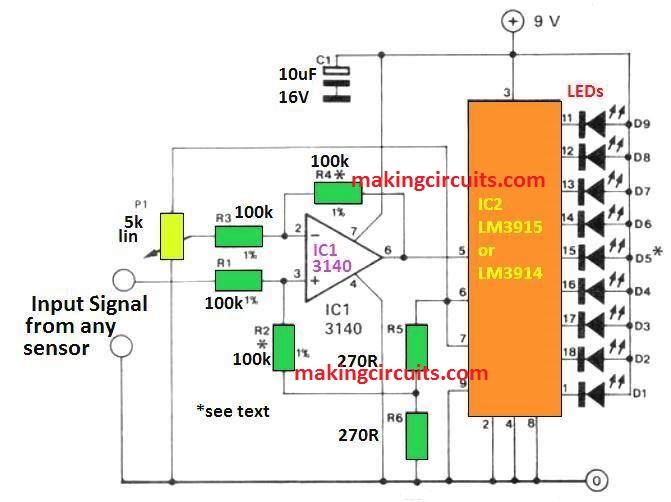
There are about 3 to 9 LEDs in the display with Ds in the centre representing point of origin in yellow.
The LED is lit by adjusting the potentiometer P1. With the change in input voltages, different LEDs are lightened.
For example, when the voltage rises slightly, D6 illuminates and again when the voltage falls, D4 gets illuminated. The LEDs D7 D9 or D3 D0 may hardly be lit according to the variations in the input signals.
The color of the LEDs depends on its application. The illumination of the middle LEDs in the bar graph is appropriately adjusted by adjusting P1.
How to Calibrate
In order to read the input voltage directly through the LED illumination, the potentiometer can be provided with a graduated scale. To calibrate the scale accurately, apply voltages in steps of 0.1V. Turn the P1 till center lights and draw a thin line at the perfect position of P1.
1V is necessary at pin 5 of IC2 to light up D1 and D9, thus making the sensitivity of the IC important. 1V is required at the input of the LEDs to operate as the amplification of IC1 is unity (R4/R3).
The potential at the junction of R5 and R6 are added to the result after the voltage at the wiper of P1 is deducted by the Opamp IC1.
The reference voltage (1.28V) can be compensated for as it is connected to P1. The P1 is connected in series to the positive supply line with a suitable resistor. If the supply line is well regulated, the display will be stable.
Sensitivity Adjust
The input sensitivity is inversely proportional to the values of R4 and R2, however these values should be kept the same.
The current consumption is about 10 times the value of current through R5 and R6 and can be primarily determined by the current through the LEDs.
This current is equal to the on-chip reference voltage of 1.28V divided by the total resistance of R5+R6.
The total current must not exceed 50mA. The maximum current through the LEDs is about 40mA with the current in pin 7 limited to 4mA