


In this post we are talking about how we can charge and use all those bad defective discarded batteries. For this we are using a very different and innovative charging method. That idea is invented by a great person whose name is John Bedini.
Why We Need This Kind of Charger
So now we know that lead acid batteries are everywhere and sometimes they can give us big problem when they become useless. We want to throw them but then we do not know where to throw them. If we throw them wrongly then these batteries will go in landfill or junkyard and start rotting and spoiling nature.
Also new batteries are very costly. So it is not always possible to buy new battery. So instead of throwing or buying if we can repair old batteries then it will help us a lot and also protect our nature.
What John Bedini Did for Us
This great man John Bedini gave us one amazing gift. He showed us how we can bring back to life all those old sulfated batteries. We can recover them and make them strong again using his special charger idea.
Now if our battery is not fully damaged but only sulfated then we can fix that battery by using this Bedini method.
But we must remember — if the battery is fully broken like if the battery has internal physical damage or if the lead plates inside are twisted or warped then we cannot do anything. That battery is gone.
But for batteries which are just weak or sulfated this idea works like magic. Bedini SSG (Simplified School Girl) motor is the name of this charger idea. It removes the sulfation from the battery plates and puts back fresh energy inside battery.
Many times we have seen that this method makes old battery even better than when it was brand new.
Why Normal Battery Charging is Bad
Now we all know that when we use a battery many times then it slowly becomes weak. We see that after some days the battery gets discharged very quickly. We keep charging again and again but every time it works for less time.
That is because normal chargers heat up the battery when they are charging. So when battery plates become hot then they become weak slowly. Because of this battery cannot store same power as before.
But with Bedini Charger it is Not Like That
This is the beautiful thing. With Bedini charger we do not have that kind of problem. I have taken old batteries from trash or waste area and used this charger to bring them back to life.
Two of those batteries had only 2 volts left in them. Normal charger was not able to charge them. But after using Bedini charger again and again then those same batteries became so powerful that now they are running my electric boat’s generator.
Now they are even better than some new batteries.
How This Bedini SSG System Works
So now we will understand how this system really works.
This motor does not start by itself. So we have to give it one small spin by hand to start it. Once it starts rotating then it will keep running by itself.
This motor changes its speed and acceleration depending on two things — size of battery and how much charge is inside that battery.
Now what happens is — when a magnet moves near the coil then a small current is generated in the main coil.
That small current turns ON the transistor. Now the transistor allows current to pass from the battery through the second coil which we call secondary coil.
The magnetic field that is created in this secondary coil gives one push to the rotor so it moves forward past the coil.
As this happens the magnetic field also switches OFF the transistor. When this happens then the magnetic field in the second coil collapses and creates something called back emf — which is a sudden high voltage.
This high voltage goes through a diode and directly charges the battery.
So in this way we get a free strong pulse of electricity going into the battery.
Now if we test this whole system then we will see that the power going into battery is more than the power used to rotate the motor.
In this Bedini method the input current is only around 150 mA to 200 mA.
But the output we get in the battery is a lot more because of that back emf.
Final Words
So this is how John Bedini’s charger gives us a way to use waste batteries again and again. We do not have to throw them. We do not have to waste money on new ones. And we also save our environment.
Now we can build this motor at home also and start experimenting.
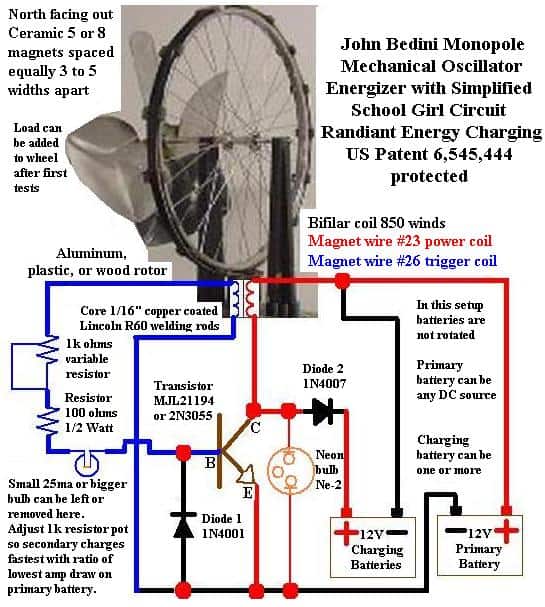
Construction of John Bedini SSG Battery Charger
First We Make the Rotor (Spinning Fan Wheel Thing)
We take any round rotor — can be a plastic fan blade, a wooden disc, or even bike wheel. Just make sure it is lightweight and can spin freely.
Now we take ceramic magnets (at least 5 or 7 or 8 pieces, North pole facing out). Space them equally all around the rim of the rotor. Like put one, then count 3 or 4 finger widths, then put next one, and so on.
These magnets will pass over the coil when rotor spins.
Coil Making Time
Now this is very important — the coil is heart of the charger. We are going to make a bifilar coil, means two wires wound together side by side.
Get magnet wire (enameled copper wire), two types:
One is #23 AWG for power coil
Other is #26 AWG for trigger coil
Wind them together on the same core, around 850 turns.
For coil core, use 1/16 inch Lincoln R60 welding rods, coated with copper — or use soft iron rods.
After winding, bring out four wires (start and end of both wires).
Transistor and Basic Wiring
Take a power transistor — either MJL21194 or 2N3055. Make sure you know which pin is base, collector, emitter.
Connect the trigger coil wire (one side) to 1k variable resistor, then to 100 ohm fixed resistor, and then to base of transistor.
The emitter of transistor goes to negative of the battery (primary side).
The collector connects to one side of the power coil and also to one leg of Diode 1 (IN4001).
Battery Setup
Now we use two 12V batteries.
First is the primary battery, which gives power to run the motor and circuit.
Second is the charging battery, which we are going to revive or charge.
Connect negative of both batteries together.
Positive of primary battery goes to the free end of the coil.
Positive of charging battery gets power through Diode 2 (IN4007) from collector output.
Other Components and Stuff
A neon bulb (NE-2) is added between collector and emitter. This is a safety device — it glows or burns out if back EMF goes too high.
Put a small 25mA or bigger bulb in the line if you want visual load indicator. Or you can skip it.
Make sure all your wires are solid and not loose.
If you want, you can add a load (like small fan or bulb) to rotor wheel after testing.
Tuning and Final Setup
Now adjust the 1k variable resistor slowly.
You want the rotor to spin smoothly and circuit to pulse nicely.
You may see the neon blink.
The charging battery should start taking some energy.
You may hear pulsing clicking sound — that is normal, that is energy pulses hitting your battery.
Important Tips
The rotor will not self-start — give it a small spin by hand.
After spin starts, it will automatically adjust its speed.
Do not rotate the batteries (keep primary as input, charging as output always).
Do not overload anything until testing is done.
Always keep checking temperature of transistor, wires — they must not get hot.
What You Will See
Slowly your dead battery will begin to accept charge.
Sometimes it may take hours or days, but it works slowly and steadily.
This is not normal charging — it is radiant energy charging, works in pulses.
You will be surprised when dead battery comes back to life.
John Bedini SSG Charger – Full Parts List (Explained Super Crude)
Batteries
Part Specs Notes
Primary Battery 12V, 7Ah or more (any old DC source) Gives the running power to the circuit. Can be a working battery or DC supply.
Charging Battery 12V, any sulfated/bad battery This is the one we are trying to revive using the Bedini charger.
Coil & Core
Part Specs Notes
Magnet Wire #23 AWG Around 30 meters Power coil winding. Thick wire.
Magnet Wire #26 AWG Around 30 meters Trigger coil winding. Thinner wire.
Turns 850 turns of both wires, side-by-side Called “bifilar coil.” Very important.
Core Rods 1/16 inch Lincoln R60 welding rods (or soft iron rods) These go inside the coil — they amplify magnetic power. Need around 6 to 8 rods.
Rotor & Magnets
Part Specs Notes
Rotor Plastic or wood disc / bike wheel / PC fan blade Something that can spin freely and hold magnets.
Magnets 5 to 8 pieces, ceramic, 1 inch round North facing out. Spaced equally around the rim. Use strong glue to fix.
Transistor
Part Specs Notes
Power Transistor MJL21194 or 2N3055 The main switching device. Needs heatsink.
Heatsink Small aluminum fin type For cooling the transistor. Add thermal paste if possible.
Resistors & Adjusters
Part Specs Notes
Variable Resistor (Pot) 1K Ohm Adjusts base current and speed. Use knob if possible.
Fixed Resistor 100 Ohm, 1/2 Watt Current limiter for transistor base.
Diodes & Protection
Part Specs Notes
Diode 1 1N4001 Flyback protection diode (across transistor).
Diode 2 1N4007 Directs radiant energy to the charging battery.
Neon Bulb NE-2 Voltage spike protector. Glows when voltage gets too high. Can save transistor.
Optional But Useful
Part Specs Notes
Load Bulb 25mA or bigger Connects to rotor for load test. Can be left open for test.
Switch 12V DPST or SPST To turn ON/OFF the supply easily.
Wiring 18 to 22 AWG hook-up wire For all connections. Keep short and neat. Use color-coded if possible.
Base/Frame Plastic sheet / wooden board Mount all components neatly on a small board or box.
Tools You May Need
Small screwdriver (for pot adjust)
Soldering iron and solder
Multimeter (to test voltage of batteries)
Hot glue or epoxy (to fix magnets)
Optional: RPM counter or LED test load
Final Tips:
Try to keep coil close to magnets, like 1 to 3 mm gap.
Rotor must spin smoothly and freely.
Battery terminal clips help for easy swapping.
Use old dead batteries first for practice.
Make sure diode direction is correct.
Do not touch coil or transistor when running — sometimes it kicks back.