The Bug detector is a highly sensitive transmitter detector designed to detect transmitters with an output power as low as 10mW, even from a distance of approximately 15 feet. This ingenious device offers a simple and efficient solution for locating bugs and dealing with them effectively.
How it Works
Equipped with a sensitivity control, skilled operators can precisely pinpoint hidden transmitters. Additionally, a minor modification allows for the replacement of the LED indicator with a small meter, giving the project a more technical appearance without necessarily improving its performance.
With minimal power requirements, only about 4mA on standby and 10mA when activated, the Bug detector can be powered by a 9V pp3 battery for an extended period.
The entire project, excluding the optional meter, is expertly mounted on a 35 x 60mm PCB, ensuring easy integration into a compact enclosure during construction.
Circuit Diagram
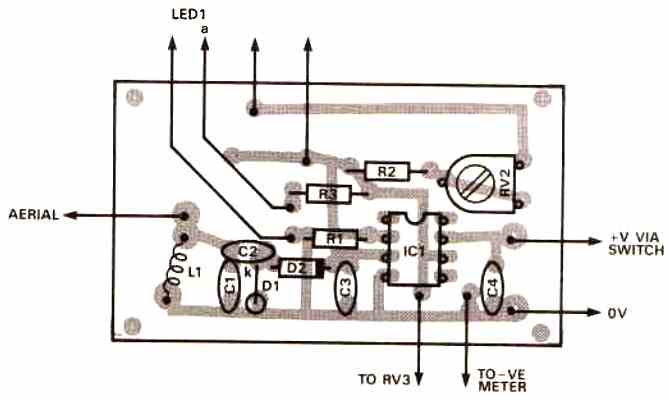
The circuit diagram of the Bug detector is illustrated in Figure 1, while Figure 2 displays the component overlay of the PCB.


Constructing the device involves creating a coil L1 by meticulously winding six turns of 24 gauge enameled copper wire to a 5mm diameter, with the use of a drill bit as a former.
Proper soldering techniques are employed to ensure a solid joint.
It is essential to observe the correct polarity of diodes and IC during assembly, but otherwise, the construction process is straightforward. Although the preset resistor RV2 may be omitted and replaced with a wire link, its purpose will be described in the subsequent section.
The aerial, which can be either a few inches of ordinary flexible wire or a telescopic antenna, plays a crucial role in the Bug detector's functionality. For optimal results, a longer antenna is generally preferred.
How to Test
In the testing and usage phase, once all components and wiring are verified, connecting a battery to the project will initiate the Bug detector.
Adjusting the variable feedback resistors to their maximum resistance ensures maximum sensitivity, although it may cause the LED to flicker unexpectedly.
Fine-tuning the coarse control RV2 will eliminate random triggering.
Readers who desire greater sensitivity at lower frequencies (e.g., 27 to 50 MHz) can enhance the Bug detector by soldering a 5.5 to 65p variable capacitor across the coil or increasing the number of coil turns to alter the bandwidth.
Conversely, removing C1 and a few turns from the coil will enable coverage of the VHF/UHF spectrum.
Notably, while the prototype features a preset RV1, a panel-mounted potentiometer with a pointer-style knob is recommended for ease of use.
To employ the Bug detector effectively, a slow sweeping action should be adopted while traversing the room.
If no signal is detected, repeat the process while adjusting the aerial's position. It is worth considering that most bugs have a vertical aerial, so using oppositely polarized aerials (one flat and one upright) can significantly affect detection sensitivity.
Aligning the aerials in the same plane enhances signal detection.
Patience and practice are essential, as locating a transmitter may require adjusting the sensitivity carefully, especially when the bug is situated several meters away.
In conclusion, the Bug detector offers a reliable and user-friendly solution for detecting and dealing with transmitters covertly placed in the vicinity, making it a valuable tool for bug detection and security maintenance.
Leave a Reply