• Skip to main content
  • Skip to primary sidebar

Making Easy Circuits

Learn and build electronic circuits

You are here: Home / Battery Chargers / Universal Nickel-Cadmium Battery Charger Circuit

Universal Nickel-Cadmium Battery Charger Circuit

Last Updated on October 11, 2020 by Admin Leave a Comment

The application of nickel-cadmium batteries in portable devices like flashguns and calculators are gaining popularity.

Equipment which comes with these rechargeable batteries is usually packaged with a standard charger.

However, when changing normal dry cells with rechargeable batteries, you would certainly need a charger.

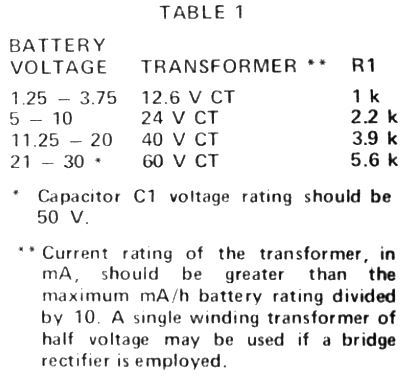
Since nickel-cadmium batteries have different voltages and ampere-hour ratings, a typical charger that is pre-configured for one type of device is unsuitable for another.

That is where the following design comes in with its universal nickel-cadmium battery charging capabilities. The rate of charging can be set from a selector switch for batteries ranging from 50 mA/h to 2500 mA/h capacity.

The charger automatically chargers any battery voltage up to 20 V and there is no need for voltage selection.

For a flat battery, the recharge time is close to 14 hours. If there’s still some charge left in the batteries, the charging time is relative to it.

The battery charger is designed in such a way that when a nickel-cadmium battery is overcharged at the right ampere/hour rate, no damage occurs to it.

The continuous charging rate can be extended up to 48 hours at the correct ampere/hour setting without killing the batteries.

How does it work?

Ni cad charger compressed
Table1

The operation of current regulators is the opposite of voltage regulators.

The current stays the same in the current regulators although there are variations in the load impedance.

In other words, the output voltage changes to keep continuous load current.

As shown in this universal Ni-Cd charger circuit, the mains voltage, 240 Vac is decreased to 40 Vac by a step-down transformer T1. The sinusoidal voltage is then rectified by diodes D1 and D2 and further filtered by C1. Eventually, we will have about 28 Vdc.

After that, this DC voltage is regulated by Q1 and its related parts to generate a current level chosen by SW2.

Then, transistor Q1 gets biased by D3 and D4 so that around 1.2 V is present between the negative terminal of C1 and the base of Q1.

Since there is around 0.6 V between the base and emitter of Q1, the same voltage will be established across resistors R2 to 27. As a result, the emitter current of Q1 must be 0.6 V divided by the resistor value chosen by SW2.

The emitter current that is produced will create almost identical collector current which charges the battery and stays constant. This is only true if there is at least 1 V between the collector and emitter of transistor Q1.

You'll also like:

  • 1.  Multiple Voltage Output 3V, 4.5V, 6V, 9V, 12V, 24V, Automatic Battery Charger Circuit
  • 2.  Simple Self-Regulating Battery Maintainer Charger Circuit
  • 3.  How to Charge a Battery Bank: Full Circuit Diagram
  • 4.  Incubator Heater Backup Circuit with Charger
  • 5.  High Power Solar LED Garden Light Circuit: Automatic ON/OFF
  • 6.  How To Make Battery Charging Fault Indicator Circuit

About Admin

Hey friends, Thanks a bunch for stopping by this site! I am an engineer with a Bachelor of Engineering in Electronics and Telecommunication. One of my passions is gathering information from all sorts of electronics books and tutorials. I then take that information and compile it into a language that is super easy to understand. My goal is to make those complex electronics circuit concepts and technical terms much more accessible for all the new and budding electronics engineers out there. I can also design customized circuit diagrams as required by the users.
If you have any questions related to this field, please do not hesitate to drop a comment! I am always here and ready to help you out with any queries you might have. I cannot wait to hear from you!

Reader Interactions

Leave a Reply Cancel reply

Your email address will not be published. Required fields are marked *

Primary Sidebar

Categories

  • 3 Phase (4)
  • 8051 Microcontroller (1)
  • Arduino (11)
  • Audio and Amplifier (102)
  • Automation (8)
  • Battery Chargers (64)
  • Bicycle Projects (4)
  • Car and Motorcycle Projects (39)
  • Datasheets (10)
  • DIY Projects (5)
  • Electrical (15)
  • Free Energy (6)
  • Games Projects (2)
  • High Voltage (14)
  • Hobby Projects (30)
  • Household Circuits (2)
  • IC 555 Circuits (5)
  • Ignition Circuits (2)
  • Indicators (50)
  • Infrared (6)
  • Inverter Circuits (29)
  • Lights and Lamps (97)
  • Medical (8)
  • Meter and Tester Circuits (38)
  • Motor Driver (17)
  • New Circuits (56)
  • Oscillators (30)
  • Pets and Pests (5)
  • Power supply (80)
  • Protection Circuits (25)
  • PWM (9)
  • Remote Control (20)
  • Security and Alarm Circuit (48)
  • Sensors and Detectors (66)
  • Signal Processor (23)
  • Solar Controller Circuits (62)
  • SSR (3)
  • Temperature Controller (20)
  • Timer (25)
  • Transformerless (7)
  • Transmitters (12)
  • Tutorials (45)
  • UPS (2)
  • Voltage Regulators (57)
  • Water Sensor and Controller (29)
  • Home
  • Privacy Policy
  • Contact
  • Disclaimer
  • Copyright

© 2025 · Making Easy Circuits