This tutorial looks at utilizing easily accessible components to make an LED wall light that is both basic and powerful. For many LED lighting applications, a phone charger—which normally provides around 500mA at 5–6 volts—can serve as an appropriate power supply. Table lamps, wall lamps, porch lights, and LED tube lights are a few examples.
Project Advantages:
Low Cost: The concept is kept affordable by using cheap LEDs and an abandoned phone charger.
Versatility: The output of the phone charger may be used with a variety of LED bulb designs.
Compact Design: Because of the phone charger's small size, a wall-mounted lamp may be mounted on it.
Repurposing Electronics: Rather than throwing away outdated phone chargers, this project promotes their reuse.
A complete circuit diagram is included for reference.
Inside Your Phone Charger: How It Converts AC to DC Power
We know how to charge our mobile phones with phone chargers.
These chargers function as AC to DC converters, changing the power outlet's alternating current (AC) to direct current (DC) at a voltage that is appropriate for the phone's battery.
Phone chargers effectively do this conversion, in contrast to large transformers.
Approximately 5 to 6 volts at 500 milliamperes of electricity are generated by a standard phone charger.
Considering the small size of these chargers, this is a respectable amount of power.
A phone charger is essentially a tiny, effective Switch-Mode Power Supply (SMPS) that provides DC power that satisfies these requirements.
It's interesting to note that white LEDs frequently function in a voltage range that is suitable for phone charger outputs. This compatibility gave rise to the concept of powering an LED wall light with an extra phone charger.
An array of white LEDs with a high brightness may be supported by a single phone charger, providing a substitute for a conventional fluorescent light (CFL). Such an LED configuration may provide light that is similar to that of a CFL.
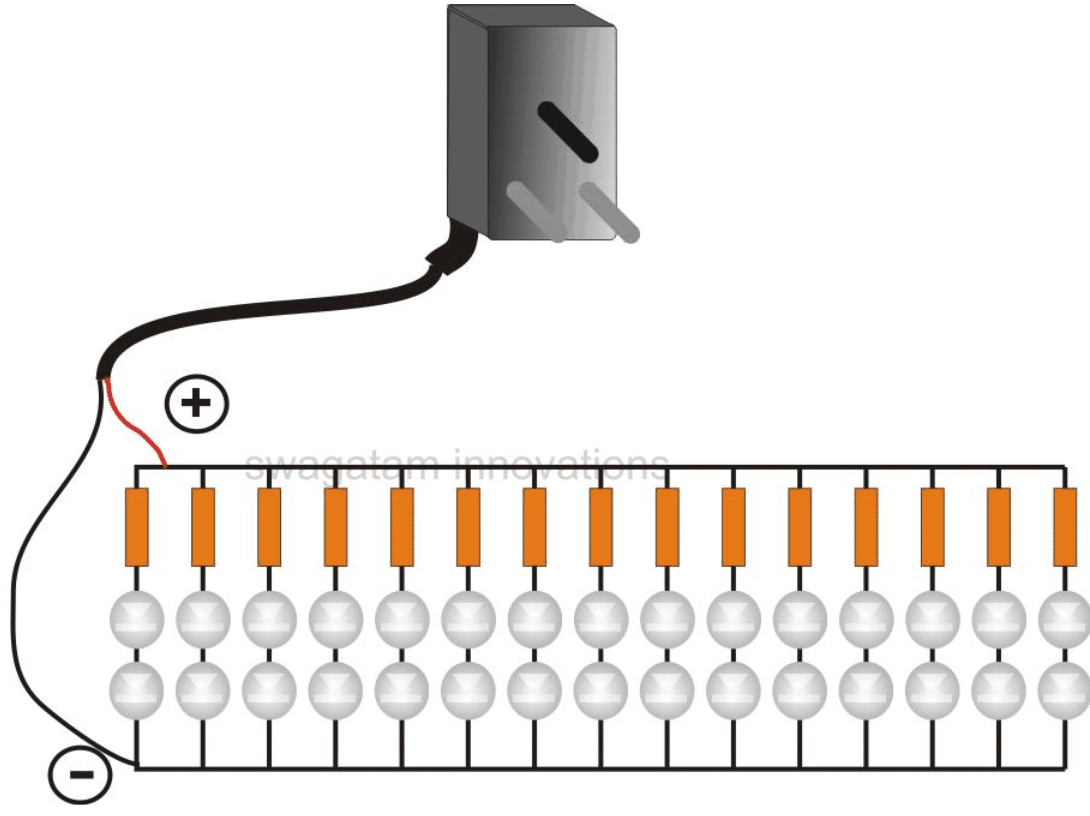
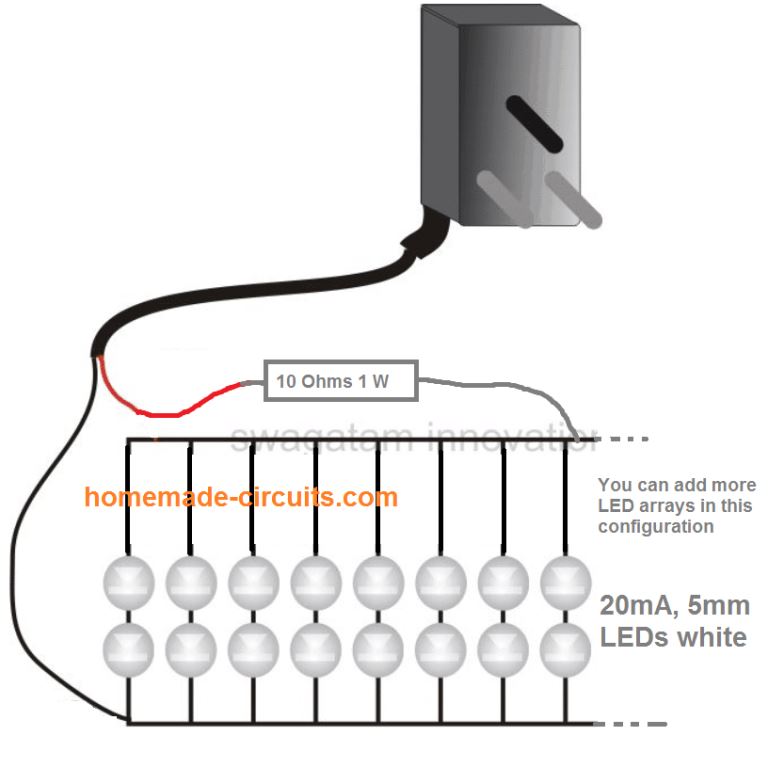
There are several things to keep in mind while powering many LEDs, even if a phone charger may offer an unloaded voltage of about 10 volts. Usually, a set of two LEDs would use about 20mA. We could probably connect 15 more of these series in parallel, increasing the total number of LEDs to about 30, given the charger's average 500mA capacity.
Materials Required:
Resistors Number:
Sufficient for the LED arrangement of your choice (see notice below)
Value: 1/4 watt rating at 68 ohms
One extra cell phone charger with a known output voltage (usually between 5 and 6 volts)
LEDs in white:
Number:
30 for a little LED tube light (change according to brightness preference)
10 for a bedroom wall light (adjust according to desired brightness)
Specifications: Select LEDs whose forward voltage is in line with the output voltage of your phone charger.
Circuit Board, Printed (PCB):
Type: All-purpose or one that fits the layout of your project.
Whether you choose to connect your LEDs in series, parallel, or a mix will determine how many resistors you require. The technique of connecting the LEDs, which will dictate how many resistors are needed, may be specified in the project information that was submitted.
How to Build
It's not too difficult to build this LED wall lamp with a phone charger. The trick is to set up the LEDs as the diagram indicates, with rows and columns.
Important Information
The current capacity (about 500mA) of the phone charger determines how many LEDs you may safely power. Overdoing it may cause harm to the LEDs or the charger.
Choosing LEDs:
Based on the required brightness and the phone charger's specs, determine how many LEDs to use.
It is advised to get advice from a project guide or a certified specialist to ascertain the appropriate quantity of LEDs for your particular phone charger.
As the literature advises using 6 LEDs for a porch light, it is important to make sure that this number corresponds with the capacity of your phone charger. To guarantee safe functioning with a greater number of LEDs, a more thorough guide can suggest adding more parts, such as resistors.
How to Make an LED Bedroom Light
A single LED may provide a gentle glow in your bedroom, which is ideal if you don't want total darkness when watching TV or watching movies. Ten LEDs would be more than bright enough to read by if you needed extra light.
As was previously mentioned above, a decent LED tube light may also be constructed by connecting a mobile phone charger power source and more than thirty LEDs.
How the LEDs Are Solded
These assembly instructions apply to all types of lamps.
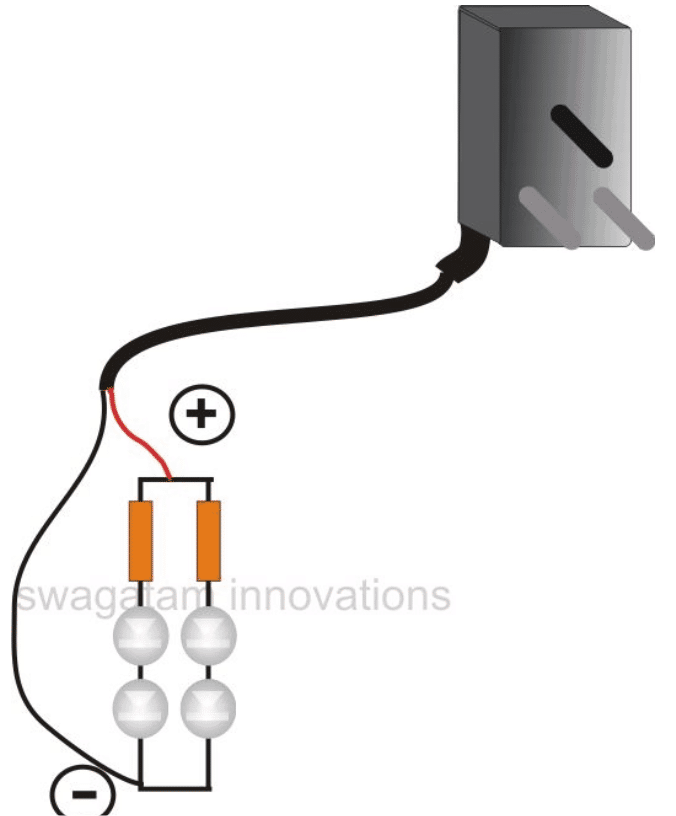
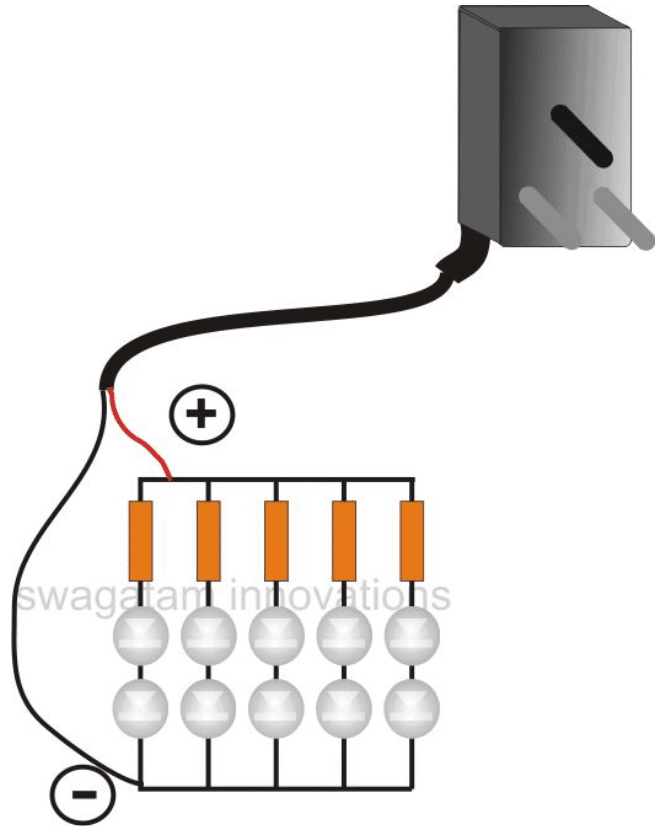
Solder two LEDs in series with a current-limiting resistor to create a series connection. Depending on the brightness you want, repeat this process to generate numerous identical groups.
Combining Series: Join all of the resistors' free ends together. This serves as the circuit's only power input. Create the second input point by doing the same with the free LED ends.
Charger Connection: Join these two terminals (one from LEDs and one from resistors) and hook them to the appropriate outputs on your phone.
Testing and Enclosure: The LEDs ought should light up if the wiring is done correctly. To give the circuit a polished appearance, now put it in an appropriate plastic casing.
A More Basic Layout
Approximately 8 volts at 1 amp are normally provided by standard phone chargers. These LED groups may be connected in parallel to create 61 different groups with just 2 LEDs in series. The output of this arrangement is 8 watts.
hej.dziekuje za pomysl z diodami led i ladowarki.szkoda ze nie masz zdjec albo krotkiego filmiku.pozdrawiam-slawomir
Hey, thanks for your candid feedback, the circuits are fully tested and works 100% because they are very basic and straightforward, so even if a video or pic are not uploaded still you can be absolutely sure about its working and try it yourself…