In this post, we’re going to put together a timer circuit designed specifically for meditation practices. This timer will produce a beeping sound that can be set to go off anywhere between 1 and 9 seconds, depending on what the user prefers.
We’ll also explore how we can incorporate this periodic beeping into a “mindfulness meditation” session later in the post.This project is aimed at beginners who are just starting out with meditation.
The beeping tone will serve as a helpful guide for those new to the practice, making it easier to stay focused during their meditation sessions.
Block diagram:

Let’s take a closer look at the block diagram we have here, moving from left to right. On the far left, we start with a clock generator that produces an output of about 1 Hz. This is created using the reliable IC 555, which is a classic component in electronics.
Next, that 1 Hz clock signal is sent to the following stage, which we call the clock divider circuit. This part of the circuit takes the 1 Hz signal and divides it down so that we get one pulse every 1 to 9 seconds. This means the meditator can easily adjust the timing based on their personal preferences.
Now, here’s where it gets a bit technical: the signal coming from the divider circuit only lasts for a few microseconds. That’s just not long enough to trigger a buzzer, so we need to add a monostable multivibrator circuit.
This circuit takes that short pulse and transforms it into an output that lasts for a set amount of time, which is just what we need.
The output from this monostable stage then goes to the buzzer circuit. This part is actually an astable multivibrator that runs at 1 kHz, creating a sound at that frequency on the speaker.
Now that we’ve gone through all this theory, let’s move on and see how we can put it all together in practice!
Circuit for the 1 Hz generator stage:

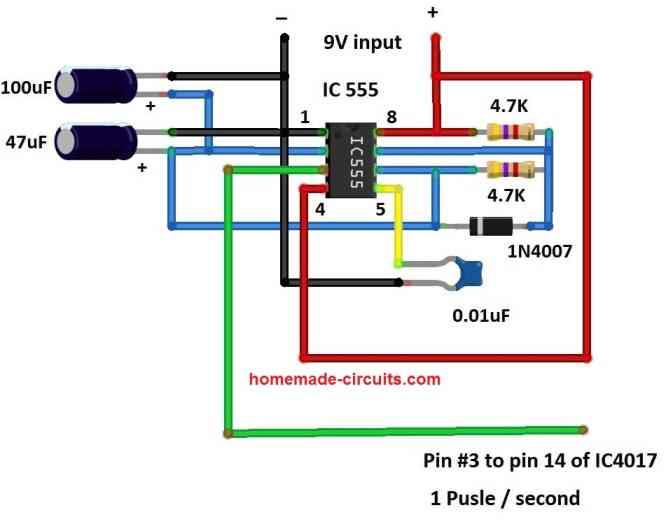
In this circuit, we’re using the IC 555 configured as an astable multivibrator. Surrounding the IC, we have some passive components like resistors and capacitors, along with one active component, which is a diode.
We’ve carefully selected the values for the resistors and capacitors to ensure that we get a clock output at a rate of 1 Hz. The diode plays an important role here by helping to create a clock output with a 50% duty cycle, which is key for our application.
At pin 2, we’ve connected two capacitors in parallel to achieve a combined capacitance of 147 µF. This specific value is what allows us to set the timing output to that desired 1 Hz.
Additionally, there’s a 0.01 µF capacitor connected to pin 5, which helps stabilize the output signal. If we were to skip this capacitor, the IC would be more susceptible to external electrical noise, and we wouldn’t get that steady 1 Hz output we’re aiming for.
Overall, this circuit and all its components are powered by either a 9V battery or a 9V power supply.
Understanding Clock divider circuit:

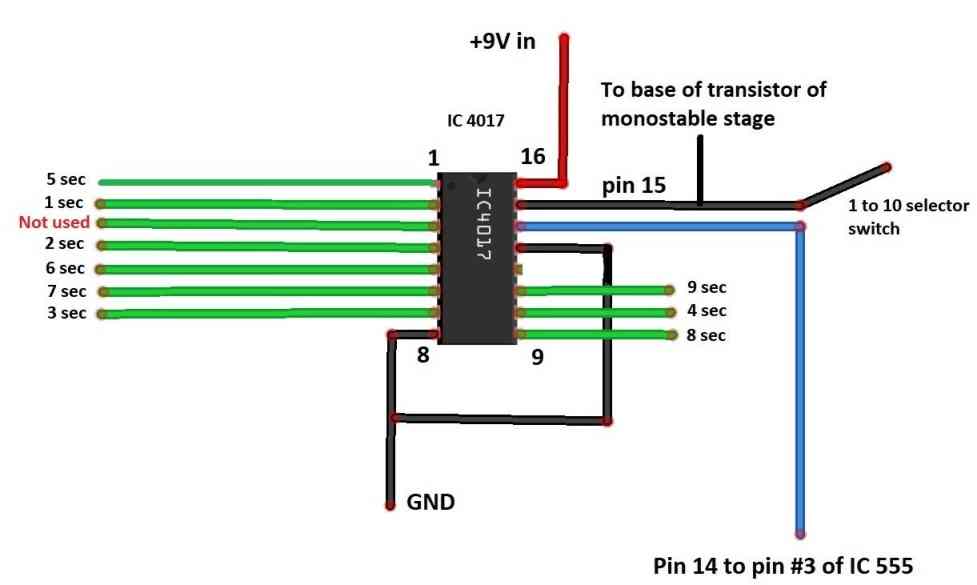
At the core of this stage is the IC 4017, which is a counter that can count from 0 all the way up to 9. It has 10 output pins, and every time we apply a clock pulse at pin #14, it moves the output up by one position.The output pins on the IC 4017 light up in a specific order: 3, 2, 4, 7, 10, 1, 5, 6, 9, and then 11.
So, when we start off, pin output #3 will be high. Then, when we send a clock pulse to pin #14, pin #3 turns low and pin #2 turns high.
If we send another clock pulse, pin #2 goes low and pin #4 lights up instead. This pattern continues for all the output pins.
To control how long we want the beeping to last, we connect the reset pin (#15) to the output pin that corresponds to our desired time.
For instance, if we want the beep to sound every 5 seconds, we would connect pin #15 to pin #1.
For convenience, we can use a rotary switch with one pole and ten positions or a DIP switch to easily select how long we want the beeping to last.
Analyzing the Monostable and buzzer stages:

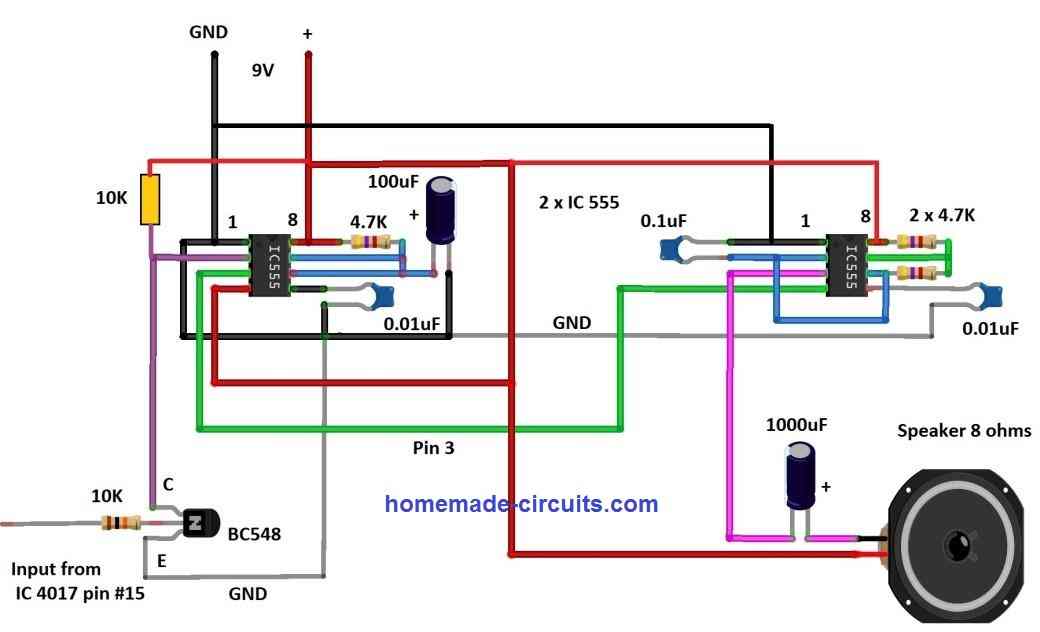
The circuit we’re looking at has two main stages. On the left side, we have an IC 555 set up as a monostable multivibrator, and on the right side, there’s another IC configured as an astable multivibrator that generates the beep sound.
When we apply a narrow negative pulse to pin #2 of the monostable multivibrator, it sends out a high signal for about 0.5 seconds.
While it’s in its idle state, we keep pin #2 pulled high using a 10K resistor. The combination of a 4.7K resistor and a 100 µF capacitor gives us that roughly 0.5-second output, which is the duration of the audible beep.
The signal coming from the IC 4017 is sent to the base of a transistor. When this transistor receives a high signal, it turns ON, which makes its output go low.
Since the output terminal (the collector) is connected to pin #2 of the monostable circuit, this causes the monostable to output a high signal for that same 0.5 seconds.Next, we connect the output from the monostable stage to pin #4 of the IC 555 on the right side, which is set up as an astable multivibrator.
When pin #4 receives a high signal, it triggers oscillations at pin #3, where we have our speaker connected, producing that 1 kHz sound. If pin #4 goes low, there will be no oscillation at pin #3, and therefore no beep.
To ensure that only the 1 kHz signal passes through to the speaker without any DC current, we’ve added a 1000 µF capacitor between pin #3 and the speaker.
And that wraps up our discussion about how this circuit works!
Simple way to integrate the beeping tone with a meditation session?
You can definitely use this timer for any meditation technique that suits you, but here, I’m going to show you how to use it specifically for mindfulness meditation.
If you’re not familiar with what mindfulness meditation is, let me give you a quick rundown. In mindfulness meditation, the main focus is on your breath—just breathing in and out—while trying not to think about anything else.
This means no chanting, no visualizations, just pure awareness of your breath.
Now, as a beginner, it’s pretty common for your mind to start wandering off at some point. When that happens, you’ll need to gently guide your focus back to your breath. You can set your meditation session for 5, 10, 15, or even 20 minutes, depending on how patient you feel that day.
For beginners, it can be tough to bring your attention back to your breath, especially since you might not even realize when your mind has drifted away.
That’s where having an external reminder, like a beep from the timer, can really help snap you back into focus and remind you to concentrate on your breathing.
So, here’s how we can use the timer:
First, find a comfortable position where you can sit. Make sure your back is straight; you can lean against a wall or use a chair for support if that helps.
Next, set the timer for something like 5 seconds and turn it on.
When you hear the first beep, take a gentle breath in. Then, when the next beep sounds, breathe out gently. Your attention should be on your breath during this time.
Sooner or later—probably sooner—your mind will start to wander again without you even realizing it. But when you hear the beep again, let it remind you to bring your focus back to your breath. The more strongly you concentrate on your breathing, the fewer distracting thoughts will pop up.
You can continue this practice for as many minutes as you like each day.The benefits of mindfulness meditation are huge, so I encourage you to do a quick Google search to learn more about them!
Just like this mindfulness practice, you can also use this timer for other types of meditation that require some timing or focus.
Now, you might be wondering why we shouldn’t just use a smartphone for this purpose. Well, here’s the thing: smartphones can be major distractions.
Imagine you’re deep in meditation and suddenly a notification pops up—that’s enough to throw off your concentration completely. You might find yourself picking up the phone or worrying about who messaged you and whether it’s important.
For many people, maintaining concentration can be quite fragile, so it’s better to stick with a simple timer.
Leave a Reply