In this post we will see how we can take an SMPS and then turn that into a solar charger circuit. This method we are going to discuss will give us a super efficient and very fast way of charging the battery from a solar panel, right?
SMPS Solar Chargers
Now SMPS, or switch mode power supplies have become very common, that means we find these everywhere. We see them as AC to DC adapters whenever we need to convert mains voltage to low voltage DC. Best example? Our mobile phone chargers. These are actually compact SMPS circuits working at 5V.
Similarly solar chargers are also getting very popular these days. People keep looking for solar chargers that can charge batteries in the best possible way, the fastest and most efficient way.
We know solar panels, or PV panels are used to charge lead-acid batteries but the problem is these batteries take a lot of time to get fully charged. And when sunlight is weak then things become even slower, which can be frustrating.
Converting a Ready-Made SMPS into a Solar Charger
Building an SMPS from scratch is not easy, that takes time, effort, and knowledge, so instead, we will just take a ready-made SMPS and modify that quickly to work as a solar charger circuit.
Materials Needed (for charging a 12V battery)
- A ready-made SMPS unit which converts 120V or 220V AC to 12V DC and has a current rating equal to one-fifth of the battery's AH rating.
- A few solar panels whose combined open circuit voltage is around 100V.
- Some connecting wires.
Steps to Convert SMPS into a Solar Charger
Okay so now let us understand how a normal SMPS works. These SMPS circuits are mostly designed to work with a minimum of 85V to 100V AC input. That means to get a stable 12V DC at the output, this SMPS must be supplied with at least 100V at the input side.
Keeping this in mind we have to select a solar panel setup that can generate approximately 100V DC to make our SMPS work properly.
But here is a problem! Normally solar panels with such high voltage are not easily available. So what do we do? We take multiple lower voltage solar panels and connect them in series to generate the required 100V.
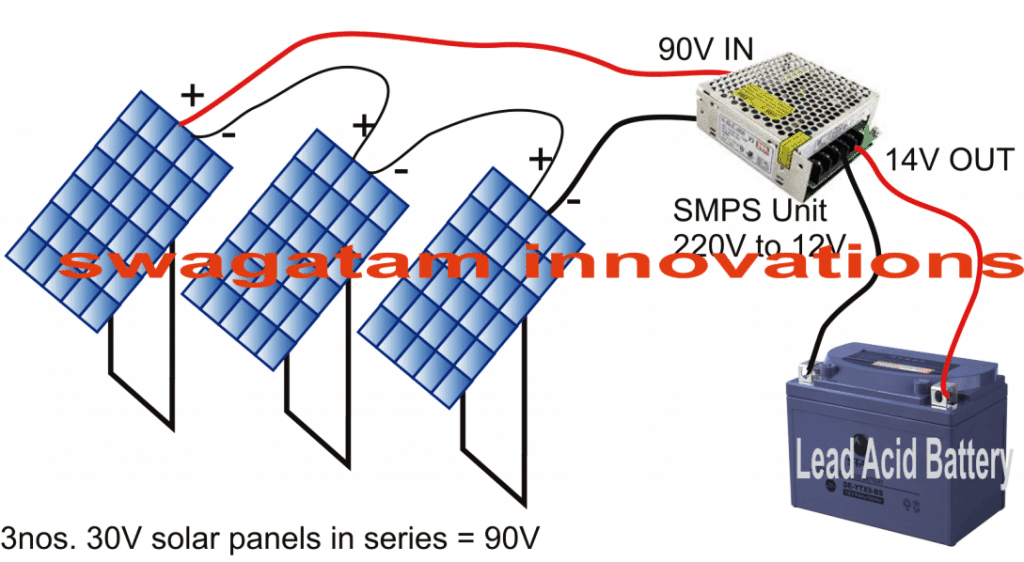
For example we can take three 30V solar panels, connect them in series and get 90V. This 90V will be close enough to power the SMPS properly.
Once we feed this 90V or 100V DC from the solar panels to the input side of the SMPS, then the SMPS will automatically step it down and give us a nice 12V DC output. This 12V output can then be directly used to charge the 12V battery efficiently.
Adjusting the SMPS Output Voltage
But wait! We have a small issue. A 12V supply is not enough to charge a 12V battery. We need at least 14V to charge it properly.
No worries! Most SMPS units have a small voltage adjustment preset, a tiny trimpot, usually near its connector. We can tweak that preset a little bit and increase the voltage from 12V to 14V easily.
But if your SMPS does not have this voltage adjustment feature then what? Still not a big deal! You can open up the SMPS circuit and manually modify it to adjust the output voltage. I have already explained how to do this in another article where I discuss modifying SMPS circuits.
Conclusion
So that is it! You have now successfully converted a ready-made SMPS into a fully working solar charger circuit. So you just got yourself an efficient, fast, and simple solar charging solution using an SMPS.
Construction Tips
Mounting Everything Nicely – Take a strong metal or plastic base and then fix the SMPS properly so that it does not shake or move. Loose things can cause damage.
Solar Panel Wiring – Make sure all solar panel connections are tight and secure. If you use thin wires, then these can heat up and waste power, so use thick wires.
Weather Protection – If you place the solar panels outside then make sure the wiring and SMPS are protected from rain and dust. You can use a waterproof box for the SMPS.
Checking Voltage Levels – Before connecting the battery, then first check the SMPS output voltage. It must be around 14V. If it is low then adjust it using the preset.
Cooling System – SMPS units can heat up so keep some ventilation or a small fan if possible. That will help it last longer.
Avoid Short Circuits – Double-check the wiring. If anything is shorted then the SMPS or the solar panels can get damaged.
Fuse Protection – Add a fuse at the SMPS output to protect the battery and SMPS from accidental overloads.
Testing Before Full Use – First test with a small load then confirm everything is working fine before permanently connecting the battery.
Leave a Reply