• Skip to main content
  • Skip to primary sidebar

Making Easy Circuits

Learn and build electronic circuits

You are here: Home / Automation / Greenhouse Temperature and Humidity Controller Circuit

Greenhouse Temperature and Humidity Controller Circuit

Last Updated on March 31, 2018 by Admin 5 Comments

In this post we are going to construct a small greenhouse temperature and humidity controller circuit using Arduino which can self-regulate its temperature and humidity.

What is Greenhouse

Plant life require light, warm conditions, air flow, water, and nourishment to outlive and cultivate; various plants have got diverse specifications for every of such requirements. A greenhouse functions by supplying the very first a couple of specifications for your vegetation, though the final three are under your control.

Supplying Light

Greenhouses are manufactured generally using translucent products, generally by means of either glass or crystal clear plastic material. This provides the plants within optimum access to sunshine, that they can utilize for photosynthesis: mixing carbon dioxide from the atmosphere and energy from sun rays to generate basic sugars, that the plant subsequently makes use of as food.

Normally, plant life require around five hours of sunshine each day, while this may differ according to the form of plant; positioning your greenhouse just where it is going to acquire total sunshine throughout the day will make sure that the plants inside obtain adequate light source.

Supplying Warmth

Greenhouses are warmer compared to outdoors simply because all of that sun rays arriving from the crystal clear glass or plastic walls results in being warmth as soon as it strikes a solid surface area, such as ground or the vegetation within the green house. Light is actually a kind of energy, which explains why plants are able to use it to initiate photosynthesis.

How a greenhouse supplies warmth

Whenever light strikes a solid surface, the area absorbs certain of this energy, transforming it to infrared energy (also known as heat) in the operation - the darker the area, the greater energy it could possibly soak up and transform into heat.

Infrared energy features a distinct "shape" than light energy - what researchers make reference to as wavelength - therefore while light can conveniently move though a greenhouse's glass surfaces, this heat will take more time to get away.

The captured temperature warms the environment within the greenhouse and due to the fact a greenhouse is pretty air-tight, the hotter air keeps inside, increasing the whole building's temperature. This is actually the very same outcome that you have undoubtedly encountered while getting in a car right after it's been being placed in a sunny parking area for a couple hours.

Together with adequate sunshine, the temperature inside a greenhouse could become a lot greater than the outdoor temperature; in reality, on a warm sunlit day you may want to air out the greenhouse all day long to maintain from virtually cooking the vegetation inside. On cloudy days or weeks, less sunshine implies that the greenhouse may warm up considerably more gently, if at all.

For this reason, greenhouses are most successful in places which have a good amount of sunlight.

Apparatus design:

A 100w fan acts as cooling source while the humidity is provided by vaporizer, you may use the vaporizer something similar as shown below.


Vap


It produces thick stream of steam which will be inlet to incubator. The steam can be carried via any flexible tube.


The flexible tube can be something similar as shown below:


Tube

The DHT11 sensor is heart of the project which may be placed at the middle of any four sides of incubator (inside) but away from the bulb or humidity inlet tube.

CPU fans can be placed as shown in the apparatus design for air circulation. For proper air circulation use at-least two fans pushing the air in opposite direction, for example: one of the CPU fan pushing downwards and another CPU fan pushing upwards.

Most CPU fan works on 12V but at 9V works just fine.

That’s all about the apparatus. Now let’s discuss on the circuit.

Schematic Diagarm:


incubator humidity digital LCD monitor control


The above circuit is for Arduino to LCD connection. Adjust 10K potentiometer for adjusting LCD contrast.


greenhouse


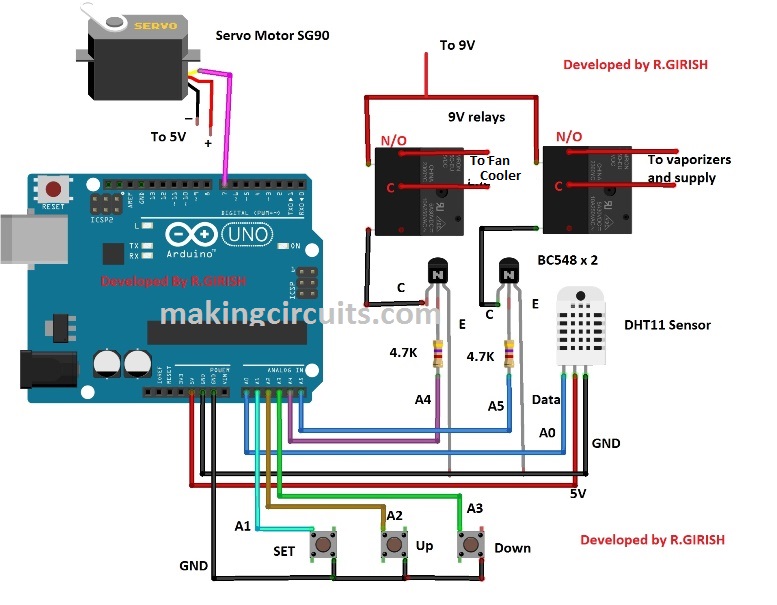
The Arduino is the brain of the project. There are 3 push buttons for setting temperature and humidity. The pin A5 controls the relay for vaporizer and A4 for the bulb. The DHT11 sensor is connected to pin A0. The pins A1, A2 and A3 used for push buttons.

The pin #7 (non-PWM pin) is connected to servo motor’s control wire; multiple servo motors can be connected to pin #7. There is misconception that servo motors works only with PWM pins of Arduino, which is not true. It works happily on non PWM pins too.

Connect a diode 1N4007 across the relay coil in reverse bias to eliminate high voltage spikes while switching on and off.

Power Supply:


Arduino incubator power supply circuit


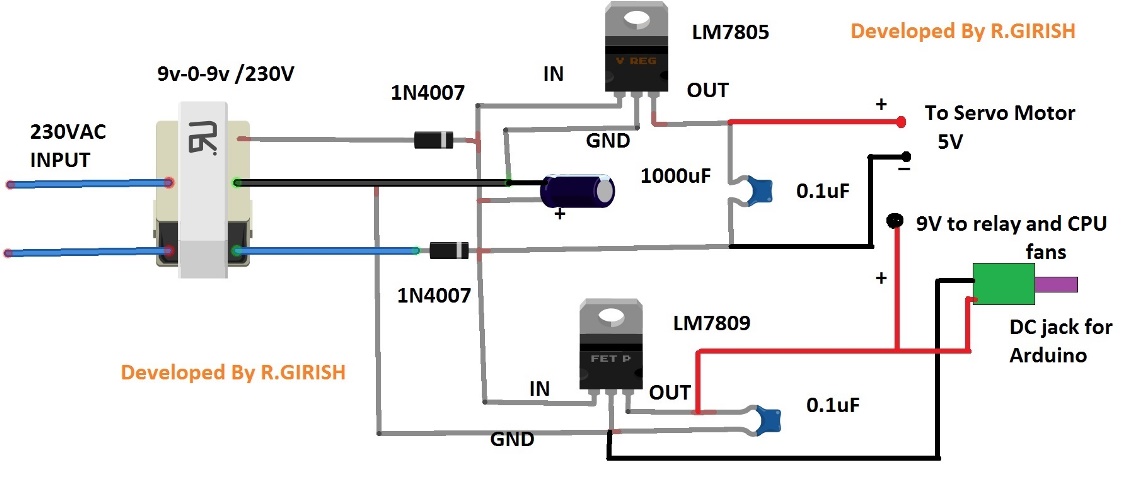
The above power supply will be able to supply 9 V and 5 V supply for the two relays, Arduino, Servo motor (SG90) and CPU fans. The DC jack has been included for powering the Arduino.

Make sure to use heat sinks for the voltage regulators.

That concludes the power supply.

Download the library DHT sensor:

https://arduino-info.wikispaces.com/file/detail/DHT-lib.zip

Program Code:

//------------------Program Developed by R.GIRISH-------------------//

#include <LiquidCrystal.h>
#include <Servo.h>
#include <dht.h>
#define DHT11 A0
const int ok = A1;
const int UP = A2;
const int DOWN = A3;
const int bulb = A4;
const int vap = A5;
const int rs = 12;
const int en = 11;
const int d4 = 5;
const int d5 = 4;
const int d6 = 3;
const int d7 = 2;
int ack = 0;
int pos = 0;
int sec = 0;
int Min = 0;
int hrs = 0;
int T_threshold = 25;
int H_threshold = 35;
int SET = 0;
int Direction = 0;
boolean T_condition = true;
boolean H_condition = true;
LiquidCrystal lcd(rs, en, d4, d5, d6, d7);
Servo motor;
dht DHT;
void setup()
{
pinMode(ok, INPUT);
pinMode(UP, INPUT);
pinMode(DOWN, INPUT);
pinMode(bulb, OUTPUT);
pinMode(vap, OUTPUT);
digitalWrite(bulb, LOW);
digitalWrite(vap, LOW);
digitalWrite(ok, HIGH);
digitalWrite(UP, HIGH);
digitalWrite(DOWN, HIGH);
motor.attach(7);
motor.write(pos);
lcd.begin(16, 2);
Serial.begin(9600);
lcd.setCursor(5, 0);
lcd.print("Digital");
lcd.setCursor(4, 1);
lcd.print("Incubator");
delay(1500);
}
void loop()
{
if (SET == 0)
{
lcd.clear();
lcd.setCursor(0, 0);
lcd.print("Set Temperature:");
lcd.setCursor(0, 1);
lcd.print(T_threshold);
lcd.print(" *C");
while (T_condition)
{
if (digitalRead(UP) == LOW)
{
T_threshold = T_threshold + 1;
lcd.setCursor(0, 1);
lcd.print(T_threshold);
lcd.print(" *C");
delay(200);
}
if (digitalRead(DOWN) == LOW)
{
T_threshold = T_threshold - 1;
lcd.setCursor(0, 1);
lcd.print(T_threshold);
lcd.print(" *C");
delay(200);
}
if (digitalRead(ok) == LOW)
{
delay(200);
T_condition = false;
}
}
lcd.clear();
lcd.setCursor(0, 0);
lcd.print("Set Humidity:");
lcd.setCursor(0, 1);
lcd.print(H_threshold);
lcd.print("%");
delay(100);
while (H_condition)
{
if (digitalRead(UP) == LOW)
{
H_threshold = H_threshold + 1;
lcd.setCursor(0, 1);
lcd.print(H_threshold);
lcd.print("%");
delay(100);
}
if (digitalRead(DOWN) == LOW)
{
H_threshold = H_threshold - 1;
lcd.setCursor(0, 1);
lcd.print(H_threshold);
lcd.print("%");
delay(200);
}
if (digitalRead(ok) == LOW)
{
delay(100);
H_condition = false;
}
}
SET = 1;
}
ack = 0;
int chk = DHT.read11(DHT11);
switch (chk)
{
case DHTLIB_ERROR_CONNECT:
ack = 1;
break;
}
if (ack == 0)
{
lcd.clear();
lcd.setCursor(0, 0);
lcd.print("Temp:");
lcd.print(DHT.temperature);
lcd.setCursor(0, 1);
lcd.print("Humidity:");
lcd.print(DHT.humidity);
if (DHT.temperature >= T_threshold)
{
delay(3000);
if (DHT.temperature >= T_threshold)
{
digitalWrite(bulb, LOW);
}
}
if (DHT.humidity >= H_threshold)
{
delay(3000);
if (DHT.humidity >= H_threshold)
{
digitalWrite(vap, LOW);
}
}
if (DHT.temperature < T_threshold)
{
delay(3000);
if (DHT.temperature < T_threshold)
{
digitalWrite(bulb, HIGH);
}
}
if (DHT.humidity < H_threshold)
{
delay(3000);
if (DHT.humidity < H_threshold)
{
digitalWrite(vap, HIGH);
}
}
sec = sec + 1;
if (sec == 60)
{
sec = 0;
Min = Min + 1;
}
if (Min == 60)
{
Min = 0;
hrs = hrs + 1;
}
if (hrs == 8 && Min == 0 && sec == 0)
{
for (pos = 0; pos <= 180; pos += 1)
{
motor.write(pos);
delay(25);
}
}
if (hrs == 16 && Min == 0 && sec == 0)
{
hrs = 0;
for (pos = 180; pos >= 0; pos -= 1)
{
motor.write(pos);
delay(25);
}
}
}
if (ack == 1)
{
lcd.clear();
lcd.setCursor(0, 0);
lcd.print("No Sensor data.");
lcd.setCursor(0, 1);
lcd.print("System Halted.");
digitalWrite(bulb, LOW);
digitalWrite(vap, LOW);
}
delay(1000);
}

//------------------Program Developed by R.GIRISH-------------------//


How to operate this incubator:

· After configuring and finishing the setup, power the circuit ON.

· The display will indicate “set temperature” you must press up or down button to obtain the required temperature and thenpress “set button”.

· After this the display will show “set Humidity” , you can now press up or down buttons to initiate the desired humidity threshold and press “set button”.

· This will set up the functioning of the greenhouse temperature and humidity control.

Please refer to the internet or consult a professional for setting up the right temperature and humidity level for the plants.

If you have any specific question regarding this Arduino greenhouse temperature and humidity controller circuit, feel free to express in the comment section. You may receive a quick reply.

You'll also like:

  • 1.  Thermal Touch Switch Circuit
  • 2.  Automotive Engine Temperature Controller Circuit
  • 3.  Thermal Indicator Circuit for Heatsinks
  • 4.  High Power Temperature Regulator using SCR
  • 5.  Automatic Kennel Door Circuit with Day Night Lock
  • 6.  Automatic Soldering Iron Switch Circuit

About Admin

Hey friends, Thanks a bunch for stopping by this site! I am an engineer with a Bachelor of Engineering in Electronics and Telecommunication. One of my passions is gathering information from all sorts of electronics books and tutorials. I then take that information and compile it into a language that is super easy to understand. My goal is to make those complex electronics circuit concepts and technical terms much more accessible for all the new and budding electronics engineers out there. I can also design customized circuit diagrams as required by the users.
If you have any questions related to this field, please do not hesitate to drop a comment! I am always here and ready to help you out with any queries you might have. I cannot wait to hear from you!

Reader Interactions

Comments

  1. operakos says

    June 12, 2019 at 4:18 pm

    i do the same and nothing happens
    nothing reads in serial monitor

    Reply
    • admin says

      June 19, 2019 at 9:11 am

      please put this question in the Arduino.cc forums, one of the experts may help you to solve the issue!

      Reply
  2. md ismail says

    January 2, 2019 at 11:37 pm

    sir you can give me the library link for this projacte

    Reply
  3. Indranil Dhua says

    March 13, 2018 at 10:15 pm

    What is the use of servo motor in this project?

    Reply
    • admin says

      March 16, 2018 at 9:50 pm

      It was earlier designed for an incubator control and now modified for greenhouse…please ignore the servo, or try innovating something from it

      Reply

Leave a Reply Cancel reply

Your email address will not be published. Required fields are marked *

Primary Sidebar

Categories

  • 3 Phase (4)
  • 8051 Microcontroller (1)
  • Arduino (11)
  • Audio and Amplifier (102)
  • Automation (8)
  • Battery Chargers (64)
  • Bicycle Projects (4)
  • Car and Motorcycle Projects (39)
  • Datasheets (10)
  • DIY Projects (5)
  • Electrical (15)
  • Free Energy (6)
  • Games Projects (2)
  • High Voltage (14)
  • Hobby Projects (30)
  • Household Circuits (2)
  • IC 555 Circuits (5)
  • Ignition Circuits (2)
  • Indicators (50)
  • Infrared (6)
  • Inverter Circuits (29)
  • Lights and Lamps (97)
  • Medical (8)
  • Meter and Tester Circuits (38)
  • Motor Driver (17)
  • New Circuits (56)
  • Oscillators (30)
  • Pets and Pests (5)
  • Power supply (80)
  • Protection Circuits (25)
  • PWM (9)
  • Remote Control (20)
  • Security and Alarm Circuit (48)
  • Sensors and Detectors (66)
  • Signal Processor (23)
  • Solar Controller Circuits (62)
  • SSR (3)
  • Temperature Controller (20)
  • Timer (25)
  • Transformerless (7)
  • Transmitters (12)
  • Tutorials (45)
  • UPS (2)
  • Voltage Regulators (57)
  • Water Sensor and Controller (29)
  • Home
  • Privacy Policy
  • Contact
  • Disclaimer
  • Copyright

© 2025 · Making Easy Circuits