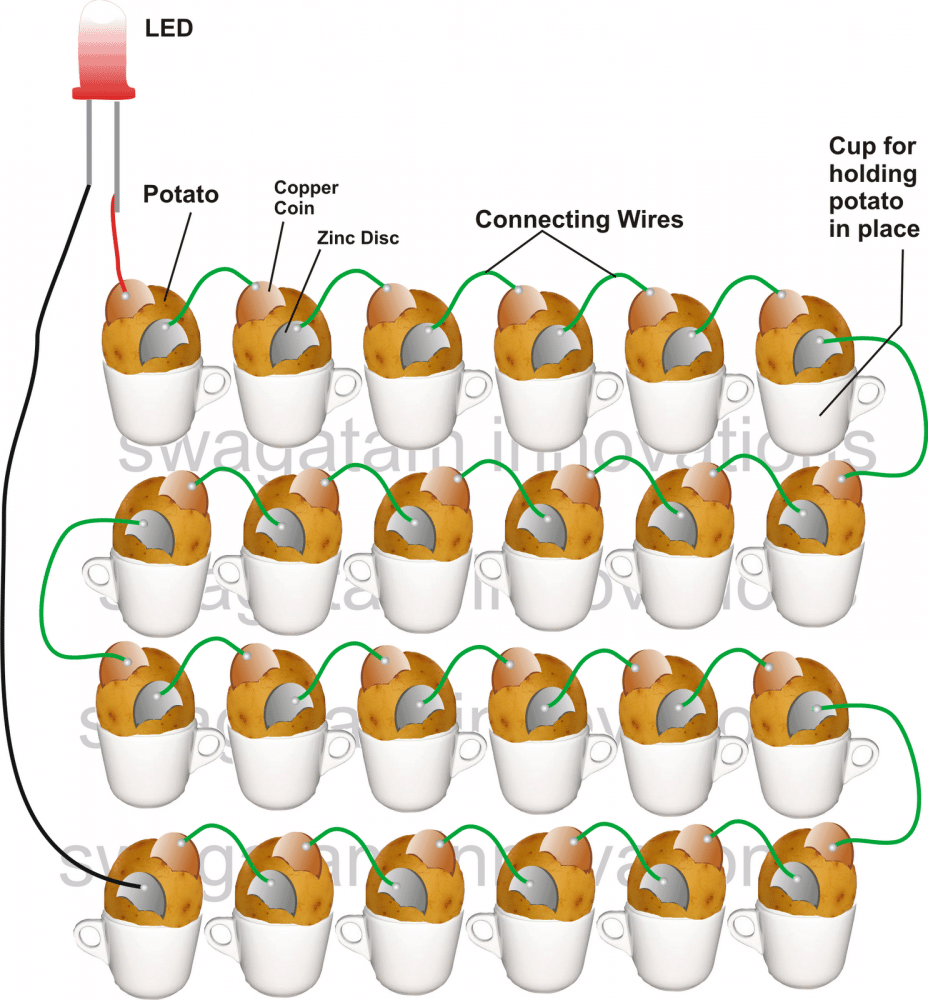
This article explores how vegetables can be utilized to create an organic battery, using a practical example of a potato battery experiment. Alessandro Volta likely originated the concept and approach of creating electricity from electrolytic solutions. In his theory, the contact of two different metals with an electrolytic solution causes electron flow between the two metals, which are externally connected by a conductor.
Opening remarks
All organisms, including plants, consist of fluid material that is generally classified as an electrolyte.
According to the mentioned idea, when two different metals are placed inside the body of a plant or any living organism, the flow of electrons should begin, leading to the creation of electricity.
All batteries including the newer SMF ones rely on this principle to produce electricity. Nevertheless, they are highly advanced and effective, enabling them to generate continuous high current for extended durations while taking up minimal space.
In this article we will attempt to examine the previously discussed information about producing electricity using vegetables and fruits. Because they are filled generously with electrolytic material, they are perfectly suited for the necessary experiments.
In the initial trial we are utilizing potatoes to produce DC power. We will familiarize ourselves with the complete process and the necessary materials for carrying it out:
How to Make a Potato Battery
For the experiment that is being planned, you will need to have the following materials:
25 medium-sized fresh potatoes.
25 sets of different metal pieces with various shapes ideally with sharp edges, in order to easily slice through the potato for creating the required connections.
25 small pieces of wire were cut into appropriate lengths and stripped at the edges in preparation for the necessary connections.
A red LED is preferable because it is easier to see in the daytime and requires low voltage to shine brightly.

Simple Ways to Assemble the Potato Battery Circuit
Wipe the potatoes with a cloth to eliminate any dirt or mud on the surface.
Also ensure that the metal components are thoroughly cleaned to remove any oxidation film residue or corrosive layers. Utilize sandpaper to buff the metals and give them a shiny finish.
Place the potatoes in a row by placing them in containers such as cups or glasses, as depicted in the image.
Begin placing the metals in a alternating manner, starting with the first potato and ending with the last one as shown in the diagram.
Connect the metal strips from one potato to the other using a soldering iron and provided wires.
At last, you will have the two metal ends of the two farthest potatoes, unrestrained and accessible.
Attach longer flexible wires to the ends of these wires and connect them to an LED in the same way as demonstrated in the diagram.
If all steps are followed accurately according to the diagram, the LED should immediately begin emitting a fairly intense light, demonstrating the chemical reactions occurring between the metals and the electrolyte within the potato.
How to Use Lemons for Generating Electricity:
It is common knowledge that lemons are acidic and experiments indicate that acids react more vigorously with different metals in contact, leading to a more effective generation of electricity.
To conduct the experiment with lemons instead of potatoes, we would need half as many lemons.
Hence we might only require 12 lemons to achieve the results mentioned above.
The process stays unchanged, like previously mentioned, and it is expected that the outcomes will be identical if followed precisely according to the instructions in the diagram.
The above test can be redone and confirmed by using a variety of fruits and vegetables and also by using different varieties of metals.
Ideally the combination of copper and zinc yields optimal outcomes, nonetheless, experimenting with alternative combinations such as copper and iron, copper and aluminum, iron and aluminum etc., is also worth considering.
Formulas and calculations
- Voltage Output
V = E_cathode - E_anode
- V = Voltage output of the battery (in volts)
- E_cathode = Reduction potential of the cathode material (e.g., copper, typically +0.34 V for Cu²⁺/Cu)
- E_anode = Oxidation potential of the anode material (e.g., zinc, typically -0.76 V for Zn/Zn²⁺)
For a zinc-copper potato battery:
V = 0.34 - (-0.76) = 1.1 V
- Current (Ohm's Law)
I = V / R
- I = Current (in amperes)
- V = Voltage output (in volts)
- R = Resistance in the circuit (in ohms)
- Power Output
P = V * I
- P = Power (in watts)
- V = Voltage output (in volts)
- I = Current (in amperes)
- Number of Cells in Series
V_total = V1 + V2 + V3 + ...
- V_total = Total voltage
- V1, V2, V3, ... = Voltage of individual cells
- Energy Stored
E = P * t
- E = Energy (in joules)
- P = Power (in watts)
- t = Time the circuit operates (in seconds)
- Internal Resistance of the Potato
R_internal = (V_OC - V_load) / I
- R_internal = Internal resistance of the potato (in ohms)
- V_OC = Open-circuit voltage
- V_load = Voltage when a load is connected
- I = Current through the circuit
Leave a Reply