In this article we now try to see how we can connect a 4x4 keypad with Arduino. But first, we need to understand what exactly a keypad is, then how it is made, and then we see how to make Arduino take key presses from this keypad and send them to serial display, ok?
what is a keypad?
A keypad is like a small keyboard but a portable type, not big like a computer keyboard. It has number keys, letter keys, and some special symbol keys or sometimes mixed types. So in this project, we now use a 4x4 matrix type keypad, which has all these key types we just talked about.
Now why do we call it 4x4? Simple because it has four rows and four columns, arranged like a matrix. It has number keys from 0 to 9, special keys "#" and "*" and letter keys A, B, C, D. But there are other types also like 4x3, 8x8, etc. But the most common types people use are 4x4 and 4x3, right?
So now in a 4x4 keypad, these four rows and four columns are linked in such a way that when we press a key, the circuit inside closes, and we can detect which key is pressed. This whole thing has a total of 8 pins, four for rows, four for columns.
But here a problem comes! This thing now needs too many I/O pins from Arduino, so we now have fewer pins left for connecting other devices. But there are tricks to read key presses using fewer Arduino pins but we not talking about those tricks here in this article, ok?
Construction Specifications:
The connecting circuit is shown below.
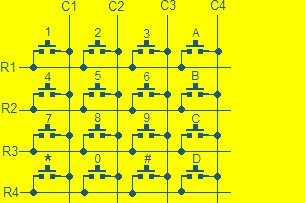
so here if we see the diagram above then we can understand that all keys are joined with one row and one column each. Now when we press any one key, suppose we press number 1 then what happens? R1 and C1 will get linked together.
This linking will send a signal and Arduino or any other microcontroller will receive this signal. Then the microcontroller will check which key got pressed. So for each key, we have a separate, unique connection happening.
Now if we need a 4x4 keypad then we can buy it from an online e-commerce website or we can get it from a local electronics shop but if we do not want to buy, we can also make it ourselves by using the diagram above. So for making one, what do we need?
We need 16 push buttons because 4x4 means 16 keys and we also need a general-purpose PCB. Then we do the wiring exactly as shown in the diagram and our homemade keypad is ready.
Arduino Keypad circuit diagram and program:

This is an initial designs that uses male-to-male header pins to make connections. The circuit's remainder should be easy to understand.
Here's how it is connected to Arduino:

When connecting the pins from the keypad to the Arduino, caution is necessary because any incorrect interconnections or wire swaps might ruin the entire project.
Pins #2 through #9 on the Arduino and keypad are connected in an ordered way. That concludes the discussion of hardware connections; we're going to proceed on to the programming sections.
Program Code:
//---------------Program developed by makingcircuits.com------//

#include <Keypad.h>

const byte ROWS = 4, COLS = 4;

const char keys[ROWS][COLS] = {
  {'1', '2', '3', 'A'},
  {'4', '5', '6', 'B'},
  {'7', '8', '9', 'C'},
  {'*', '0', '#', 'D'}
};

const byte rowPins[ROWS] = {9, 8, 7, 6};
const byte colPins[COLS] = {5, 4, 3, 2};

Keypad keypad = Keypad(makeKeymap(keys), rowPins, colPins, ROWS, COLS);

void setup() {
  Serial.begin(9600);
}

void loop() {
  char key = keypad.waitForKey();  // Wait for a key press
  if (key) {  // Ensure key is valid before printing
    Serial.println(String("You pressed: ") + key);
  }
}
Output:

How we use the Keypad
Ok in this program, we are using a two-dimensional array concept. It means that we are arranging the keypad layout inside the program the same way as the actual keypad looks. Now see, we have row pins as 9, 8, 7, 6, and column pins as 5, 4, 3, and 2. So we are connecting these pins to the Arduino to match the keypad structure.
Now look at this line in the code: “char key = keypad.waitForKey();”. What is this doing? This line is making the program stop and wait until some key is pressed. The moment we press any key, that key’s value will get stored inside a variable called ‘key’. Then we use Serial.print(); to display this key on the serial monitor. So, whatever key we press, it will show up there.
Now may be you are thinking “Where do we even use keypads?” Ok let us talk about that. Keypads are used almost everywhere—whenever a person needs to enter some input into a machine. Think about it, the smartphone or computer you are using right now has a keypad! ATMs have keypads. Vending machines use them. Printers have them. Even your TV remote has keypad buttons. So keypads are super common in electronics.
By now we have understood quite a lot about keypads and how to connect them with Arduino. So Now, it is your turn to get creative and build something with this knowledge.
But wait! One more important thing. Before you run the program, you must download and install the keypad library. Otherwise the program will not compile. You can get it from this link: github.com/Chris--A/Keypad. So first add the library then you can proceed to test your keypad project!