In this post we learn to make a super cheap but super effective solar charger, mimicking an MPPT effect, all under $3! Even a beginner can make this, no complicated stuff, just a solar panel, some diodes, and a switch. That is it!
What is Maximum Power Point Solar Tracking (MPPT)?
Now when we hear MPPT, it sounds very technical and very advanced, right? Yes it is true, MPPT chargers are smart devices that keep solar panel power optimized without disturbing its voltage-current curve.
But in simple words, MPPT just means taking power from the panel in such a way that its voltage does not drop too much. If we load the panel too much then its voltage drops badly and it becomes inefficient.
This open is the open circuit voltage oof the solar panel which is also called the knee voltage wheere the panel happens to deliver the maximum soolar power with highest efficiency. If due to an overload, as the panel voltage tends to drop below this knee level, the output tends to get more and more inefficient and power is wasted.
For example suppose if a panel open circuit voltage is 20V and we connect it directly to a 12V battery then the panel voltage will be forced to drop to 12V which is bad! It will waste power. Instead an MPPT helps to extract max power while keeping the panel voltage high.
How Do We Do This Without MPPT?
Now, here's a free method that can mimic an MPPT charging effect! We just choose a solar panel whose open circuit voltage is close to the required charging voltage.
For example for a 12V battery a 15V solar panel is a good choice. But real life is not perfect—solar panels do not give the same voltage all day, because sunlight keeps changing. That is why we always pick a higher-rated panel, so even when sunlight is weak, the panel still charges the battery.
Now don’t worry—we do not need expensive MPPT circuits for this! We can do the same trick with diodes and a rotary switch, spending just a few bucks!
How the Circuit Works
Ok, now let us look at the circuit diagram below. We want to avoid pulling down the panel voltage too much. For this, we need:
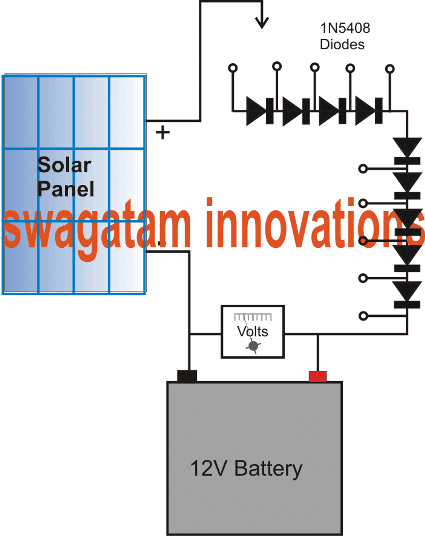
- An appropriately rated solar panel
- Some 1N5408 diodes (each drops around 0.6V)
- A simple voltmeter or multimeter
- A rotary switch (manual but works fine!)
Now, suppose:
The panel voltage (open circuit) is 20V
The battery voltage is 12V
Now if we connect them directly, then panel voltage will drop to 12V which is very bad. So we add diodes in series. These diodes block direct voltage drop and help maintain a higher voltage.
By adding 9 diodes, we get:
Total voltage drop = 9 × 0.6V = 5.4V
Battery max charging voltage = 14.4V
Total = 20V - 5.4V = around 19V at the panel
Now this prevents the panel voltage from dropping too much and still gives good charging power!
Adjusting for Changing Sunlight
Ok, now here is the trick: sunlight keeps changing. When the sunlight becomes weaker, then panel voltage drops below 20V. We monitor the voltmeter and if we see the voltage getting too low, then we simply bypass some diodes using the rotary switch.
This means:
When it is Strong sunlight → Use more diodes
When it is Weak sunlight → Use fewer diodes
This way we always keep the panel voltage high and get the best power from it without using any expensive MPPT circuit!
Final Words
So now we can apply this trick to any solar panel and battery, just by adding/removing diodes. No fancy electronics, no expensive controllers, just a few diodes and a switch—and boom, we have a manual MPPT like charger!
So it is a zero-cost method for getting max power from a solar panel without disturbing its voltage too much. Simple, effective and anyone can make it!
Parts List
| Part | Specification | Quantity |
|---|---|---|
| Solar Panel | 15V–20V, 1A or more | 1 |
| Diodes | 1N5408 (3A, 100V) | 9 or more |
| Rotary Switch | Multi-position (6 to 12 positions) | 1 |
| Digital Voltmeter | 0-20V range | 1 |
| Wires | Thick copper wires | As needed |
| Soldering Kit | Soldering iron + solder wire | 1 set |
| Heat Shrink Tubes | For insulation | As needed |
How We Will Build This Cheap Solar Charger Step by Step
Ok now we see how to build this solar charger but we must be careful because wrong connections can burn things or damage the battery. We do not want that, so we follow this properly, ok?
- First Pick the Right Solar Panel
We take a 15V to 20V solar panel if we are charging a 12V battery.
It should give at least 1A current but more amps mean faster charging.
If the sun is not strong, a higher wattage panel is better.
- Now Set Up the Diodes
We use 1N5408 diodes because these can handle 3A current.
We connect them one after another in series on the positive wire from the solar panel.
These diodes block reverse current but also drop voltage (each one by 0.6V).
More diodes = more voltage drop, but this helps control the charging voltage.
- Then Add a Switch for Adjusting the Charge
We use a rotary switch with many positions.
This switch skips diodes one by one when we rotate it.
So if sunlight is weak then we remove some diodes to increase the charging voltage.
If sunlight is strong, then we use more diodes to prevent overcharging.
- Now Connect a Voltmeter
A cheap voltmeter (or even a multimeter) is needed.
We connect it to the battery terminals.
This lets us see the charging voltage and adjust the switch properly.
- Finally Make Safe Connections
Solar panels can send high current, so we must use thick wires.
Solder all joints properly or use good-quality connectors.
Wrap all open wires with heat shrink tubing so they do not short circuit.
If diodes get hot, then we attach them to a metal surface for cooling.
Very Important Warnings!
⚠️ Polarity Must Be Right! → If we reverse the battery wires, then we burn the diodes or damage the battery. So double-check before connecting.
⚠️ Don’t Overcharge! → A lead-acid battery should not go above 14.4V, so if voltage goes too high, then we turn the switch to add more diodes.
⚠️ Battery Can Release Gas! → If charging too fast, then battery might release hydrogen gas. So we keep it in an open space.
⚠️ Diodes Can Get Hot! → If current is too high, then diodes might burn fingers. So do not touch while charging.
⚠️ Short Circuit is Dangerous! → If we short the battery wires, then it can cause fire! So we cover all metal parts properly.
Leave a Reply