The majority of electrical amateurs would want to build the circuit for the digital time clock that is described here.
You may have heard of digital clocks that use clock integrated circuits (ICs), such the well-known LM8361, MM5387, and others, however these ICs may be difficult to construct or highly outdated nowadays.
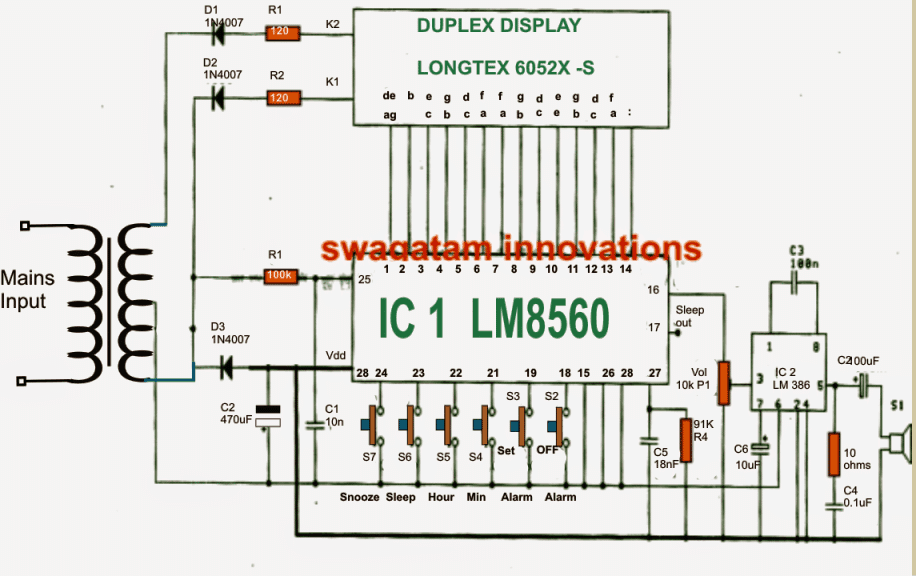
Functioning of Circuits
In regards to features and specifications, the current design is both significantly simpler and on par with its predecessors.
Additionally, this digital clock circuit has the benefit of a Duplex LED display model, which helps to simplify the design by lowering the number of interconnections and interconnections between the IC1 (LM8560) and the LED display.
We'll now examine the operation of the suggested digital clock circuit:
As can be seen from the above figure, the IC1 (LM8560), which is connected to the following output terminals, forms the circuit's heart:
- The output (pins 1–14) that drives the display's Duplex Model numbers
- Pin 16's output for producing an alert signal.
- The output choice, that may be used to use an integrated automated timer to operate external electrical equipment.
To enable a 50 Hz clock input to pin 25 of the IC, components R1 and C1 are included into the circuit.
In order to generate an alternating functioning of the display brightness in response to the input of IC1, the diodes D1 and D2 are positioned as rectifiers to act as signal generators to the cathode of the display number.
The amplifier stage for operating a loudspeaker when alarm triggers is formed by connecting the alarm signal via pin 16 of IC1 to a potentiometer P1 (Volume) and then integrating it with pin 3 of IC2 (LM386).
The purpose of the P1 is to give the alarm signal loudness an adjustment option. Furthermore, any additional required trigger circuit could possibly be controlled by the signal from pin 17's "sleep" pinout.
How to set the time in this digital clock
1. S6 is used to set hours.
2. S4 is used to set minutes.
The switches listed below can be employed for setting the alarm time:
1. S3 to hold down the time
2. S5 to set hours for the alarm.
3. S4 to set minutes for the alarmm.
The alarm might start to chime after the time range specified through S4/S5 has passed. This can be silenced by hitting switch S2, or really any other switch among those provided.
The switches listed below can be employed for controlling an outside equipment using clock triggers.
Switch S6 must be kept pushed at first.
For setting minutes, hit S4.
To adjust the hours, push switch S5.
Pin 17 of the IC may be used to obtain the output signal for the ON/OFF control of equipment described above.
For every repetition of an alert, use a time dilation alarm.
You might wish to push switch S7 to activate this feature if you would like to repeat the alarm or prolong it for an additional nine minutes.
Circuit Diagram
Leave a Reply